Linux 部署v2ray
架构:v2ray+WebSocket+TLS+Nginx
其实就是将流量全部伪装成https流量,由于线路上有海量的https流量,增加墙的处理难度,很大程度会被放行,但难免会被限速.
操作系统:
- 对于CentOS,安装最新的CentOS 7或CentOS 8版本。
- 对于Ubuntu,安装最新的Ubuntu 18.04或Ubuntu 20.04版本。
安装必要的依赖项:
centos
sudo yum install curl vim wget
ubuntu
sudo apt update
sudo apt install curl vim wget
安装v2ray
下载安装脚本
cd /usr/local/src
curl -O https://raw.githubusercontent.com/v2fly/fhs-install-v2ray/master/install-release.sh
curl -O https://raw.githubusercontent.com/v2fly/fhs-install-v2ray/master/install-dat-release.sh
安裝v2ray
bash install-release.sh
安裝最新发行的 geoip.dat 和 geosite.dat
bash install-dat-release.sh
修改v2ray配置文件
vim /usr/local/etc/v2ray/config.json
{
"log": {
    "loglevel": "debug",
    "access": "/var/log/v2ray/access.log",
    "error": "/var/log/v2ray/error.log"
  },
"dns":{
"servers":["8.8.8.8","8.8.4.4","localhost"],
"clientIp":"服务器IP"
},

  "inbounds": [
    {
      "port": 10000,
      "listen":"127.0.0.1",
      "protocol": "vmess",
      "settings": {
        "clients": [
	  {"id": "513a4540-24ce-4ae2-a59c-bfb0616dac39","alterId": 64},
	  {"id": "d59fd1a9-7ba3-4b73-91e8-e0770a00de5d","alterId": 64}
        ]
      },
      "streamSettings": {
        "network": "ws",
        "wsSettings": {
        "path": "/ray"
        }
      }
    }
  ],
  "outbounds": [
    {
      "protocol": "freedom",
      "settings": {}
    }
  ]
}
- clientIp: 当前linux服务器ip地址
- port:随机指定没有被使用的端口,跟后面nginx配置保持一致
- id: 用
uuid命令随机生成 - network: ws
- path: 随机指定,跟后面nginx配置保持一致
重启v2ray并设置开机自启
systemctl restart v2ray.service && systemctl enable v2ray.service
部署nginx
centos安装nginx参考:https://technology.sharespace.top/centos7-yum-nginx/
ubuntu安装nginx参考:https://technology.sharespace.top/ubuntu-apt-nginx/
修改nginx配置
vim /etc/nginx/conf.d/v2ray.conf
server {
        listen 443 ssl http2;
        server_name vpn.sharespace.top;
        ssl_certificate /etc/letsencrypt/live/vpn.sharespace.top/fullchain.pem;
        ssl_certificate_key /etc/letsencrypt/live/vpn.sharespace.top/privkey.pem;
        ssl_protocols TLSv1.2 TLSv1.3;
        ssl_ciphers HIGH:!aNULL:!MD5;

        location / {
	root /usr/share/nginx/html;
	index index.html;
        }

 location = /ray {
      if ($http_upgrade != "websocket") {
          return 404;
      }
      proxy_redirect off;
      proxy_pass http://127.0.0.1:10000;
      proxy_http_version 1.1;
      proxy_set_header Upgrade $http_upgrade;
      proxy_set_header Connection "upgrade";
      proxy_set_header Host $host;
      # Show real IP in v2ray access.log
      proxy_set_header X-Real-IP $remote_addr;
      proxy_set_header X-Forwarded-For $proxy_add_x_forwarded_for;
    }
 location ~ \.git { return 404; }

}

server {
    listen       80;
    server_name vpn.sharespace.top;
    if ($host = vpn.sharespace.top) {
        return 301 https://$host$request_uri;
    }
    return 404;
}
将 vpn.sharespace.top 换成自己的域名,并安装https证书,参考:https://technology.sharespace.top/certbot/
检查语法重启nginx
nginx -t && systemctl restart nginx
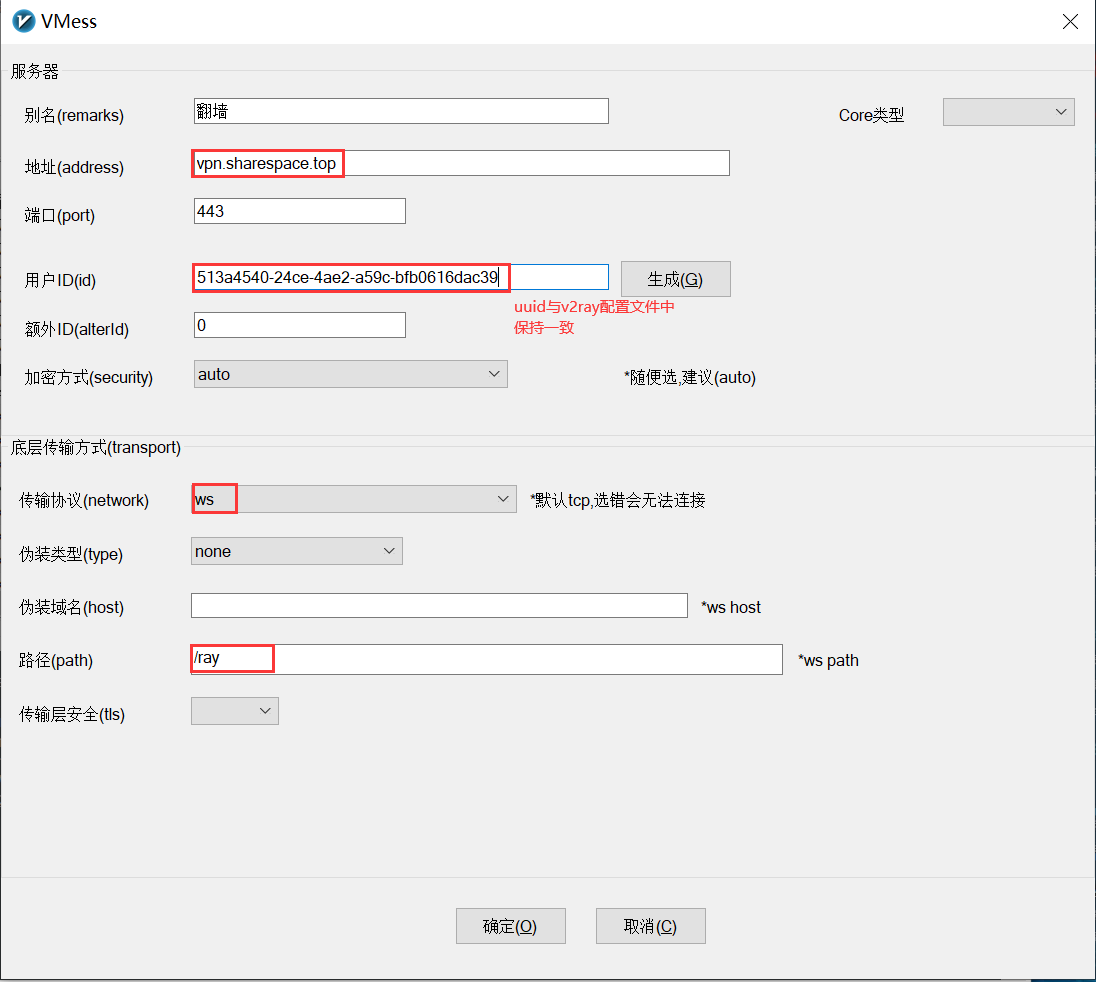
安装v2ray客户端软件使用我们的代理
到 https://github.com/2dust/v2rayN/releases 下载 v2rayN-Core.zip 最新版
添加节点

一条评论
Justin
谢谢 Nico 的分享,有空我也去试试!